Spring Boot – SOAP Web Service
Spring Boot – SOAP Web Service
Artykuł ten ma na celu wystawienie usługi sieciowej z użyciem Spring Boota i technologii SOAP. Są dwa podejścia do tworzenia usług sieciowych. Pierwsze polega na wygenerowaniu kontraktu – WSDL na podstawie istniejących w projekcie klas. Drugie natomiast polega na zaprojektowaniu kontraktu a następnie na wygenerowaniu odpowiednich powiązanych z kontraktem klas. Zaczynamy od nowego projektu Spring Boota i dodania odpowiednich zależności do pliku pom.xml:
<dependency>
    <groupId>org.springframework.boot</groupId>
    <artifactId>spring-boot-starter-web-services</artifactId>
</dependency>
<dependency>
    <groupId>wsdl4j</groupId>
    <artifactId>wsdl4j</artifactId>
</dependency>
Jako, że spring-boot-starter-web-services to biblioteka wspierająca jedynie podejście contract-first należy zaprojektować schemat XSD (standard służący do definiowania struktury dokumentu XML) który zostanie użyty do wygenerowania kontraktu WSDL. Przykładowy schemat:
Plik ./resources/xsd-schema.xsd:
<?xml version="1.0" encoding="UTF-8"?>
<xs:schema xmlns:xs="http://www.w3.org/2001/XMLSchema"
           xmlns:tns="https://www.javaleader.pl"
           targetNamespace="https://www.javaleader.pl" elementFormDefault="qualified">

    <xs:element name="getCountryRequest">
        <xs:complexType>
            <xs:sequence>
                <xs:element name="name" type="xs:string"/>
            </xs:sequence>
        </xs:complexType>
    </xs:element>

    <xs:element name="getCountryResponse">
        <xs:complexType>
            <xs:sequence>
                <xs:element name="country" type="tns:country"/>
            </xs:sequence>
        </xs:complexType>
    </xs:element>

    <xs:complexType name="country">
        <xs:sequence>
            <xs:element name="name" type="xs:string"/>
            <xs:element name="population" type="xs:int"/>
            <xs:element name="capital" type="xs:string"/>
            <xs:element name="currency" type="tns:currency"/>
        </xs:sequence>
    </xs:complexType>

    <xs:simpleType name="currency">
        <xs:restriction base="xs:string">
            <xs:enumeration value="GBP"/>
            <xs:enumeration value="EUR"/>
            <xs:enumeration value="PLN"/>
        </xs:restriction>
    </xs:simpleType>
</xs:schema>
Po zdefiniowaniu schematu należy wygenerować powiązane z nim klasy, w tym celu należy dodać do pliku pom.xml plugin: – jaxb2-maven-plugin:
<!-- Generate the Domain Java Classes -->
<plugin>
	<groupId>org.codehaus.mojo</groupId>
	<artifactId>jaxb2-maven-plugin</artifactId>
	<version>1.6</version>
	<executions>
		<execution>
			<id>xjc</id>
			<goals>
				<goal>xjc</goal>
			</goals>
		</execution>
	</executions>
	<configuration>
		<schemaDirectory>${project.basedir}/src/main/resources/</schemaDirectory>
		<outputDirectory>${project.basedir}/src/main/java</outputDirectory>
		<clearOutputDir>false</clearOutputDir>
	</configuration>
</plugin>
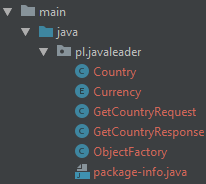
W fazie kompilacji projektu zostaną wygenerowane odpowiednie klasy:
mvn compile
Tworzymy repozytorium – namiastkę bazy danych:
@Component
public class CountryRepository {

    private static final Map<String, Country> countries = new HashMap<>();

    @PostConstruct
    public void initData() {
        Country poland = new Country();
        poland.setCapital("Warszawa");
        poland.setCurrency(Currency.PLN);
        poland.setPopulation(37866107);
        countries.put("Poland", poland);
    }

    public Country findCountry(String name) {
        return countries.get(name);
    }
}
definiujemy usługę:
@Endpoint
public class CountryEndpoint {

    private static final String NAMESPACE_URI = "https://www.javaleader.pl";

    private CountryRepository countryRepository;

    @Autowired
    public CountryEndpoint(CountryRepository countryRepository) {
        this.countryRepository = countryRepository;
    }

    @PayloadRoot(namespace = NAMESPACE_URI, localPart = "getCountryRequest")
    @ResponsePayload
    public GetCountryResponse getCountry(@RequestPayload GetCountryRequest request) {
        GetCountryResponse response = new GetCountryResponse();
        response.setCountry(countryRepository.findCountry(request.getName()));

        return response;
    }
}
- @Endpoint – rejestruje klasę jako endpoint (punkt końcowy usługi) ,
- @PayloadRoot – odwzorowanie żądania na odpowiednią metodę,
- @ResponsePayload, @ResponseRequest – mapowanie na wygenerowaną klasę żądania, odpowiedzi,
Klasa konfiguracyjna – WebServiceConfig:
@EnableWs
@Configuration
public class WebServiceConfig extends WsConfigurerAdapter {

    @Bean
    public ServletRegistrationBean messageDispatcherServlet(ApplicationContext applicationContext) {
        MessageDispatcherServlet servlet = new MessageDispatcherServlet();
        servlet.setApplicationContext(applicationContext);
        servlet.setTransformWsdlLocations(true);
        return new ServletRegistrationBean(servlet, "/ws/*");
    }

    @Bean(name = "countries")
    public DefaultWsdl11Definition defaultWsdl11Definition(XsdSchema countriesSchema) {
        DefaultWsdl11Definition wsdl11Definition = new DefaultWsdl11Definition();
        wsdl11Definition.setPortTypeName("CountriesPort");
        wsdl11Definition.setLocationUri("/ws");
        wsdl11Definition.setTargetNamespace("https://www.javaleader.pl");
        wsdl11Definition.setSchema(countriesSchema);
        return wsdl11Definition;
    }

    @Bean
    public XsdSchema countriesSchema() {
        return new SimpleXsdSchema(new ClassPathResource("xsd-schema.xsd"));
    }
}
Klasa konfiguracyjna rejestruje następujące ziarna:
- ServletRegistrationBean – przechwytywanie żądań dostępnych pod adresem ./ws/*, jako parametr wstrzykiwany jest parametr kontekstu aplikacji dzięki czemu inne beany są widoczne przez Spring-WS,
- DefaultWsdl11Definition – standard WSDL 1.1,
- XsdSchema – lokalizacja schematu XSD, w tym przypadku katalog ./resources.
Klasa startowa projektu:
@SpringBootApplication
public class SpringBootSoapApplication {
	public static void main(String[] args) {
		SpringApplication.run(SpringBootSoapApplication.class, args);
	}
}
Po uruchomieniu aplikacji zostanie wygenerowany plik kontraktu WSDL dostępny pod adresem:
http://localhost:8080/ws/countries.wsdl
Do przetestowania aplikacji użyjemy narzędzia SoapUI:
Wysyłamy żądanie (request):
<soapenv:Envelope xmlns:soapenv="http://schemas.xmlsoap.org/soap/envelope/" xmlns:jav="https://www.javaleader.pl">
   <soapenv:Header/>
   <soapenv:Body>
      <jav:getCountryRequest>
         <jav:name>Poland</jav:name>
      </jav:getCountryRequest>
   </soapenv:Body>
</soapenv:Envelope>
w wyniku otrzymujemy (response):
<SOAP-ENV:Envelope xmlns:SOAP-ENV="http://schemas.xmlsoap.org/soap/envelope/">
   <SOAP-ENV:Header/>
   <SOAP-ENV:Body>
      <ns2:getCountryResponse xmlns:ns2="https://www.javaleader.pl">
         <ns2:country>
            <ns2:population>37866107</ns2:population>
            <ns2:capital>Warszawa</ns2:capital>
            <ns2:currency>PLN</ns2:currency>
         </ns2:country>
      </ns2:getCountryResponse>
   </SOAP-ENV:Body>
</SOAP-ENV:Envelope>
Leave a comment