Maszyna stanów w Spring Boot
Maszyna stanów w Spring Boot
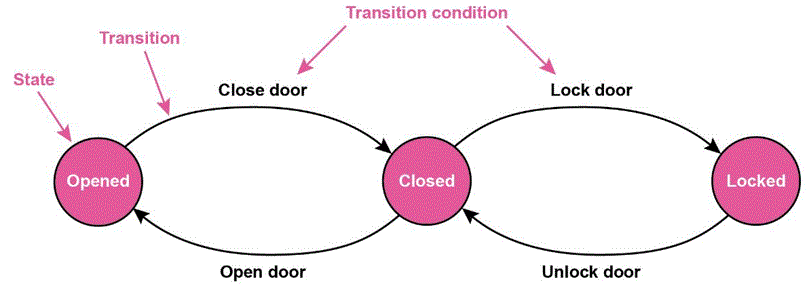
Maszyna stanów pozwala zilustrować w postaci diagramu przejścia obiektu przez różne jej stany. Jest to bardzo użyteczne narzędzie w projektowaniu aplikacji. Przykładem może być projekt gry komputerowej. Schemat opisuje wtedy w jakim stanie może znaleźć się gracz oraz jakie warunki muszą być spełnione aby w tym stanie mógł się znaleźć. Poniżej dwa przykłady diagramów prostej maszyny stanów:

[źródło] http://www.trccompsci.online/mediawiki/index.php/Finite_State_Machines
 [źródło] http://ucgosu.pl/2019/08/implementacja-maszyn-stanu-na-tablicach/
Spring Boot udostępnia zależność która realizuje założenia maszyny stanów:
<dependency>
    <groupId>org.springframework.statemachine</groupId>
    <artifactId>spring-statemachine-core</artifactId>
    <version>1.2.3.RELEASE</version>
</dependency>
Do dzieła! Tworzymy nowy projekt Spring Boota – plik pom.xml – niezbędne zależności:
<dependencies>
	<dependency>
		<groupId>org.springframework.boot</groupId>
		<artifactId>spring-boot-starter-web</artifactId>
	</dependency>
	<dependency>
		<groupId>org.springframework.statemachine</groupId>
		<artifactId>spring-statemachine-core</artifactId>
		<version>1.2.3.RELEASE</version>
	</dependency>
	<dependency>
		<groupId>org.springframework.boot</groupId>
		<artifactId>spring-boot-starter-test</artifactId>
		<scope>test</scope>
		<exclusions>
			<exclusion>
				<groupId>org.junit.vintage</groupId>
				<artifactId>junit-vintage-engine</artifactId>
			</exclusion>
		</exclusions>
	</dependency>
</dependencies>
Klasa konfiguracyjna w której zawarte są informacje dotyczące stanów w jakich maszyna może się znajdować:
@Configuration
@EnableStateMachine
public class SimpleStateMachineConfiguration
  extends StateMachineConfigurerAdapter<String, String> {

    @Override
    public void configure(StateMachineStateConfigurer<String, String> states)
      throws Exception {

        states
          .withStates()
          .initial("SI")
          .end("SF")
          .states(
            new HashSet<String>(Arrays.asList("S1", "S2")));

    }

    @Override
    public void configure(
      StateMachineTransitionConfigurer<String, String> transitions)
      throws Exception {

        transitions.withExternal()
          .source("SI").target("S1").event("E1").and()
          .withExternal()
          .source("S1").target("S2").event("E2").and()
          .withExternal()
          .source("S2").target("SF").event("end");
    }
}
RestController:
@RestController
public class StateMachineController {

    @Autowired
    private StateMachine<String, String> stateMachine;

    @GetMapping("/sentEvent/{event}")
    public String sentEvent(@PathVariable("event") String event) {
        stateMachine.start();
        stateMachine.sendEvent(event);
        return stateMachine.getState().getId();
    }

}
Początkowy stan to SI, końcowy stan to SF
przejścia pomiędzy stanami (tranzycje):
SI -> S1 -> S2 -> SF
eventy które wyzwalają przejścia pomiędzy stanami:
event E1: SI -> S1
event E2: S1 -> S2
event end: S2 ->SF
Testy:
http://localhost:8080/sentEvent/E2
wynik:
SI
ponownie:
http://localhost:8080/sentEvent/E2
wynik:
SI
Wniosek:
Jeśli maszyna stanów będzie w stanie początkowym SI (z ang. state initial) to nie jest możliwe przejście np. do stanu S2 bez przejścia kolejno przez inne stany prowadzące do stanu S2.
Akcje
Dodajmy akcje do klasy konfiguracyjnej która będzie wykonana w momencie przejścia ze stanu S1 to stanu S2. Akcja ta wyświetli na konsoli informacje o aktualnym stanie w jakim maszyna się znajduje:
@Bean
public Action<String, String> printStateIdAction() {
    return ctx -> System.out.println(ctx.getTarget().getId());
}
@Override
public void configure(
  StateMachineTransitionConfigurer<String, String> transitions)
  throws Exception {

    transitions.withExternal()
      .source("SI").target("S1").event("E1").and()
      .withExternal()
      .source("S1").target("S2").event("E2").action(printStateIdAction()).and()
      .withExternal()
      .source("S2").target("SF").event("end");
}
Słuchacze – StateMachineListener
Logowanie informacji o aktualnych przejściach pomiędzy stanami skonfigurujemy w następujący oto sposób z użyciem klasy StateMachineListener:
public class StateMachineListener extends StateMachineListenerAdapter {
    @Override
    public void stateChanged(State from, State to) {
        System.out.printf("[LOG] Transitioned from %s to %s%n", from == null ? "none" : from.getId(), to.getId());
    }
}
trzeba również dodać metodę do klasy konfiguracyjnej która rejestruję klasę Listenera:
@Override
public void configure(StateMachineConfigurationConfigurer<String, String> config) throws Exception {
    config
            .withConfiguration()
            .autoStartup(true)
            .listener(new StateMachineListener());
}
Wynik:
[LOG] Transitioned from S1 to S2
[LOG] Transitioned from S2 to SF
Stan rozszerzony
Stan rozszerzony pozwala nam śledzić ile razy dany stan został wywołany:
@Bean
public Action<String, String> countNumbersOfInvokeStateS1() {
    return ctx -> {
        int approvals = (int) ctx.getExtendedState().getVariables()
                .getOrDefault("counter", 0);
        approvals++;
        ctx.getExtendedState().getVariables()
                .put("counter", approvals);

        System.out.println("counter " + approvals);
    };
}
rozszerzamy konfigurację o nową akcję związaną ze stanem rozszerzonym:
@Override
public void configure(StateMachineStateConfigurer<String, String> states)
  throws Exception {

    states
      .withStates()
      .initial("SI")
      .end("SF")
      .states(new HashSet<String>(Arrays.asList("S1", "S2"))).state("S1", countNumbersOfInvokeStateS1());
}
Przykład – wywołujemy kolejno:
localhost:8080/sentEvent/E1
localhost:8080/sentEvent/E2
localhost:8080/sentEvent/end
Wynik:
counter 1
localhost:8080/sentEvent/E1
localhost:8080/sentEvent/E2
localhost:8080/sentEvent/end
Wynik:
counter 2
localhost:8080/sentEvent/E1
localhost:8080/sentEvent/E2
localhost:8080/sentEvent/end
Wynik:
counter 3
Walidacja przejścia – Guard
Zanim nastąpi przejście z jednego stanu do drugiego być może potrzebna będzie weryfikacja danych, można to osiągnąć z użyciem konstrukcji – Guard:
@Bean
public Guard<String, String> guard() {
    return ctx -> (int) ctx.getExtendedState()
            .getVariables()
            .getOrDefault("counter", 0) >= 0;
}
@Override
public void configure(
  StateMachineTransitionConfigurer<String, String> transitions)
  throws Exception {

    transitions.withExternal()
      .source("SI").target("S1").event("E1").guard(guard()).and()
      .withExternal()
      .source("S1").target("S2").event("E2").action(printStateIdAction()).and()
      .withExternal()
      .source("S2").target("SF").event("end");
}
Instrukcje warunkowe – junction
Warunkowe przejścia między stanami realizujemy w następujący sposób z użyciem metody junction():
@Override
public void configure(StateMachineStateConfigurer<String, String> states)
  throws Exception {
    states
      .withStates()
      .initial("SI")
      .end("SF").junction("J")
      .states(new HashSet<String>(Arrays.asList("S1", "S2"))).state("S1", countNumbersOfInvokeStateS1());
}
@Override
public void configure(
  StateMachineTransitionConfigurer<String, String> transitions)
  throws Exception {
    transitions.withExternal()
      .source("SI").target("S1").event("E1").guard(guard()).and()
      .withExternal()
      .source("S1").target("J").event("E2").action(printStateIdAction()).and()
      .withExternal().and()
            .withJunction()
            .source("J")
            .first("S2", firstGuard())
            .then("SF",  secondGuard())
            .last("SF")
            .and()
            .withExternal()
            .source("S2").target("SF").event("E3");
}
Po przejściu do stanu J następuje instrukcja warunkowa – jeśli firstGuard() zwróci true to przejdź do stanu S2, w przeciwnym wypadku przejdź do stanu SF jeśli secondGuard() zwróci true. Jeśli warunki te są niespełnione przejdź do stanu koncowego SF.
Oddzielne gałęzie
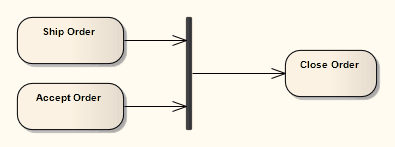
W momencie kiedy zależy nam na tym aby rozdzielić wykonywanie zadań na dwie oddzielne i niezależne ścieżki to należy zastosować mechanizm Fork (rozdzielanie) wraz z mechanizmem Join (łączenie). Przykładowo:
Fork

Join
[źródło] http://sparxsystems.com/enterprise_architect_user_guide/10/standard_uml_models/forkjoin.html

[źródło] http://sparxsystems.com/enterprise_architect_user_guide/10/standard_uml_models/forkjoin.html
@Override
public void configure(StateMachineStateConfigurer<String, String> states)
  throws Exception {
    states
      .withStates()
      .initial("SI")
      .fork("SFork")
      .join("SJoin")
      .end("SF").junction("J")
      .states(new HashSet<String>(Arrays.asList("S1", "S2"))).state("S1", countNumbersOfInvokeStateS1())
            .and()
            .withStates()
                .parent("SFork")
                .initial("Sub1-1")
                .end("Sub1-2")
            .and()
            .withStates()
                .parent("SFork")
                .initial("Sub2-1")
                .end("Sub2-2");
}
@Override
public void configure(
  StateMachineTransitionConfigurer<String, String> transitions)
  throws Exception {
    transitions.withExternal()
      .source("SI").target("S1").event("E1").guard(guard()).and()
      .withExternal()
      .source("S1").target("J").event("E2").action(printStateIdAction()).and()
      .withExternal().and()
            .withJunction()
            .source("J")
            .first("S2"  , firstGuard())
            .then("SFork", secondGuard())
            .last("SF")
            .and()
            .withExternal()
            .source("S2").target("SF").event("E3").and()
            .withFork()
                .source("SFork")
                .target("Sub1-1")
                .target("Sub2-1")
            .and()
            .withJoin()
                .source("Sub1-2")
                .source("Sub2-2")
                .target("SJoin").and().withExternal()
            .source("SI").target("SFork").event("E1")
            .and().withExternal()
            .source("Sub1-1").target("Sub1-2").event("sub1")
            .and().withExternal()
            .source("Sub2-1").target("Sub2-2").event("sub2");
}
Testujemy:
http://localhost:8081/sentEvent/E1
wynik:
SFork
http://localhost:8081/sentEvent/sub1
wynik:
SFork
http://localhost:8081/sentEvent/sub2
wynik:
SJoin
Dopóki nie zakończą się zadania Sub1-1 oraz Sub2-1 nie zostanie wykonane przejście do stanu join.
Wyliczenia zamiast typu String
Zamiast na sztywno używać typu String co powoduje błędy powinniśmy używać wyliczeń, np. dla definiowania stanów:
public enum States {
    S1, S2, SI, SF,SFork
}
wtedy w konfiguracji klasy należy podać jako typ parametryczny powyższego enuma:
@Configuration
@EnableStateMachine
public class SimpleStateMachineConfiguration
  extends StateMachineConfigurerAdapter<States, String> {

...
od teraz można używać wyliczeń do definiowania stanów:
@Override
public void configure(StateMachineStateConfigurer<State, String> states)
  throws Exception {
    states
      .withStates()
      .initial(States.S1)

...

Leave a comment