Angular frontend + Spring Boot backend
Angular frontend + Spring Boot backend
Dzisiejszy wpis bazuje na artykule dostępnym pod adresem: http://developer.okta.com/blog/2017/12/04/basic-crud-angular-and-spring-boot autorstwa
Angular to framework oparty o język JavaScript zaprojektowany przez firmę google który w ostatnich latach zyskał ogromne uznanie wśród developerów warstwy frontendu aplikacji. Niewątpliwie ogromną zaletą tej biblioteki jest jej minimalizm, oznacza to, że biblioteka potrafi zlokalizować zmiany w modelu i wprowadzić adekwatne zmiany w kodzie HTML. Narzucenie wzorca MVC umożliwia łatwe testowanie aplikacji a wieloplatformowość pozwala tworzyć aplikację webowe, mobilne czy desktopowe. W tym artykule zaprojektujemy aplikację – REST API używając do tego Spring Boota która będzie pełnić rolę back-endu. Ta aplikacja będzie dostarczać dane do warstwy frontendowej napisanej właśnie z użyciem Angulara. Do dzieła!
Na początek należy zarejestrować się na stronie http://www.okta.com. Pozwoli to na zabezpieczenie naszej aplikacji w modelu SSO (z ang. Single sign–on). Tworzymy nowy projekt Spring Boot – niezbędne zależności – plik pom.xml:
Spring Boot API
<dependencies>
	<dependency>
		<groupId>org.springframework.boot</groupId>
		<artifactId>spring-boot-starter-actuator</artifactId>
	</dependency>
	<dependency>
		<groupId>org.springframework.boot</groupId>
		<artifactId>spring-boot-starter-data-jpa</artifactId>
	</dependency>
	<dependency>
		<groupId>org.springframework.boot</groupId>
		<artifactId>spring-boot-starter-data-rest</artifactId>
	</dependency>
	<dependency>
		<groupId>org.springframework.boot</groupId>
		<artifactId>spring-boot-starter-web</artifactId>
	</dependency>
	<dependency>
		<groupId>org.springframework.boot</groupId>
		<artifactId>spring-boot-starter-security</artifactId>
	</dependency>
	<dependency>
		<groupId>org.springframework.security.oauth.boot</groupId>
		<artifactId>spring-security-oauth2-autoconfigure</artifactId>
		<version>2.0.0.RELEASE</version>
	</dependency>
	<dependency>
		<groupId>com.h2database</groupId>
		<artifactId>h2</artifactId>
		<scope>runtime</scope>
	</dependency>
	<dependency>
		<groupId>org.projectlombok</groupId>
		<artifactId>lombok</artifactId>
		<optional>true</optional>
	</dependency>
	<dependency>
		<groupId>org.springframework.boot</groupId>
		<artifactId>spring-boot-starter-test</artifactId>
		<scope>test</scope>
	</dependency>
</dependencies>
Model danych – API dostarczać będzie informacji o dostępnych samochodach:
@Entity
public class Car {

    @Id
    @GeneratedValue
    private Long id;

    private @NonNull String name;

    public Long getId() {
        return id;
    }

    public void setId(Long id) {
        this.id = id;
    }

    public String getName() {
        return name;
    }

    public void setName(String name) {
        this.name = name;
    }
}
Repozytorium JPA:
@RepositoryRestResource
@CrossOrigin(origins = "http://localhost:4200")
    interface CarRepository extends JpaRepository<Car, Long> {
}
Jako, że aplikacja dostarczająca REST API będzie dostępna na innym porcie niż aplikacja konsumująca REST API z użyciem żądań AJAX to potrzebny jest mechanizm umożliwiający współdzielenie zasobów pomiędzy serwerami znajdującymi się w różnych domenach. Adnotacja @CrossOrigin to adnotacja pozwalająca na dostęp do repozytorium aplikacji Spring Boot dla aplikacji frontendowej w ramach lokalnego serwera.
RestController:
@RestController
class CoolCarController {
    private CarRepository repository;

    public CoolCarController(CarRepository repository) {
        this.repository = repository;
    }

    @GetMapping("/cool-cars")
    @CrossOrigin(origins = "http://localhost:4200")
    public Collection<Car> coolCars() {
        return repository.findAll().stream()
                .filter(this::isCool)
                .collect(Collectors.toList());
    }

    private boolean isCool(Car car) {
        return !car.getName().equals("AMC Gremlin") &&
                !car.getName().equals("Triumph Stag") &&
                !car.getName().equals("Ford Pinto") &&
                !car.getName().equals("Yugo GV");
    }
}
Klasa uruchamiająca aplikację:
@EnableResourceServer
@SpringBootApplication
public class DemoApplication {

    public static void main(String[] args) {
        SpringApplication.run(DemoApplication.class, args);
    }

    @Bean
    ApplicationRunner init(CarRepository repository) {
        return args -> {
            Stream.of("Ferrari", "Jaguar", "Porsche", "Lamborghini", "Bugatti",
                    "AMC Gremlin", "Triumph Stag", "Ford Pinto", "Yugo GV").forEach(name -> {
                Car car = new Car();
                car.setName(name);
                repository.save(car);
            });
            repository.findAll().forEach(System.out::println);
        };
    }

    @Bean
    @SuppressWarnings("unchecked")
    public FilterRegistrationBean simpleCorsFilter() {
        UrlBasedCorsConfigurationSource source = new UrlBasedCorsConfigurationSource();
        CorsConfiguration config = new CorsConfiguration();
        config.setAllowCredentials(true);
        config.setAllowedOrigins(Collections.singletonList("http://localhost:4200"));
        config.setAllowedMethods(Collections.singletonList("*"));
        config.setAllowedHeaders(Collections.singletonList("*"));
        source.registerCorsConfiguration("/**", config);
        FilterRegistrationBean bean = new FilterRegistrationBean(new CorsFilter(source));
        bean.setOrder(Ordered.HIGHEST_PRECEDENCE);
        return bean;
    }
}
Adnotacja @EnableResourceServer włącza serwer autoryzacji, jest to jedna z dwóch składowych aplikacji typu OAuth2. Adnotacja ta włączając serwer autoryzacji odpowiada za autoryzację użytkowników czyli uwierzytelnianie – weryfikacja loginu i hasła.
Plik application.yml – należy uzupełnić client-id o wygenerowaną w serwisie unikalną wartość:
security:
    oauth2:
        client:
            access-token-uri: http://dev-125577.oktapreview.com/oauth2/default/v1/token
            user-authorization-uri: http://dev-125577.oktapreview.com/oauth2/default/v1/authorize
            client-id:
            scope: openid profile email
        resource:
            user-info-uri: http://dev-125577.oktapreview.com/oauth2/default/v1/userinfo
            token-info-uri: http://dev-125577.oktapreview.com/oauth2/default/v1/introspect
            prefer-token-info: false
Angular Client
Jeśli pracujemy w systemie Windows – ściągamy paczkę Node.js ze strony http://nodejs.org/en/download/ Następnie instalujemy narzędzie Angular CLI używając przy tym (menadżera pakietów – npm) wydając z poziomu terminala (polecam to zrobić za pomocą GitBasha) polecenie:
npm install -g @angular/cli
należy pamiętać aby skonfigurować zmienną środowiskową:
NODE_HOME która wskazuje na katalog gdzie znajduje się rozpakowana paczka z Node.js.
Angular CLI to narzędzie do szybkiego i łatwego i efektywnego generowania projektu z użyciem biblioteki Angular. Tworzymy zatem nowy projekt:
ng new clientsprawdzamy czy wszystko jest prawidłowo dostępne wyświetlając wersje narzędzi:
– wersja menadżera pakietów – npm:
npm - version– wersja Angular CLI:
ng version
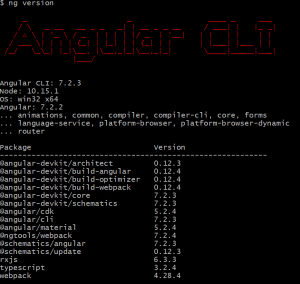
– wersja Node.js:
node -vPrzechodzimy do folderu projektu – ./client i instalujemy grafikę – Angular Material:
cd client
npm install --save-exact @angular/material@5.2.4 @angular/cdk@5.2.4
tworzymy usługę:
ng g s car
powstałe pliki – car.service.spec.ts oraz car.service.ts kopiujemy do katalogu ./src/app/shared/car. Katalog ten musi być wcześniej samodzielnie utworzony np poleceniem mkdir.
zawartość pliku car.service.spec.ts:
import { Injectable } from '@angular/core';
import { HttpClient } from '@angular/common/http';
import { Observable } from 'rxjs/Observable';

@Injectable()
export class CarService {

  public API     = '//localhost:8888';
  public CAR_API = this.API + '/cars';

  constructor(private http: HttpClient) {
  }

  getAll(): Observable<any> {
    return this.http.get(this.API + '/cool-cars');
  }

  get(id: string) {
    return this.http.get(this.CAR_API + '/' + id);
  }

  save(car: any): Observable<any> {
    let result: Observable<Object>;
    if (car['href']) {
      result = this.http.put(car.href, car);
    } else {
      result = this.http.post(this.CAR_API, car);
    }
    return result;
  }

  remove(href: string) {
    return this.http.delete(href);
  }
}
@Injectable() oznacza, że zależności zostaną prawidłowo zainicjalizowane (wstrzyknięte) przez konstruktor. Konstruktor w Angularze powinien być wykorzystywany do wstrzykiwania zależności. W przeciwnym wypadku wystąpiłby błąd:
Error: Can't resolve all parameters for CarService: (?).
metody getAll() oraz save(car: any) zwracają obiekt typu Observable<any>() z bilioteki rxjs/Observable. Są to obiekty obserwowane czyli emitujące pewne wartości. Reaktywność pozwala na asynchroniczne przekazywanie danych pomiędzy komponentami. Angular wykorzystuje potęgę programowania reaktywnego!
Drugi z plików to testy jednostkowe dla usługi. Konwencja mówi o tym, że dla każdego pliku *.ts powinien istnieć plik .spec.ts. Testy uruchamiane są poleceniem:
ng test
W pliku ./src/app/app.module.ts dodajemy:
import { CarService } from './shared/car/car.service';
import { HttpClientModule } from '@angular/common/http';

@NgModule({
  declarations: [
    AppComponent
  ],
  imports: [
    BrowserModule,
    HttpClientModule
  ],
  providers: [CarService],
  bootstrap: [AppComponent]
})
Klasa CarService zależy od wartości przekazanej do konstruktora. Aby wstrzyknięcie tej zależności zadziałało prawidłowo niezbędne jest dodanie klasy CarService do tablicy providers:
Tworzymy nowy komponent:
ng g c car-listWygenerowane zostaną teraz 4 pliki:
CREATE src/app/car-list/car-list.component.html (23 bytes)
CREATE src/app/car-list/car-list.component.spec.ts (636 bytes)
CREATE src/app/car-list/car-list.component.ts (276 bytes)
CREATE src/app/car-list/car-list.component.css (0 bytes)
UPDATE src/app/app.module.ts (402 bytes)
Plik car-list.component.ts:
import { Component, OnInit } from '@angular/core';
import { Observable        } from 'rxjs/Observable';

import { CarService        } from '../shared/car/car.service';
import { GiphyService      } from '../shared/giphy/giphy.service';

@Component({
  selector    : 'app-car-list',
  templateUrl : './car-list.component.html',
  styleUrls   : ['./car-list.component.css']
})
export class CarListComponent implements OnInit {

  cars: Array<any>;

  constructor( private carService   : CarService,
               private giphyService : GiphyService) {
               }

  ngOnInit() {

    this.carService.getAll().subscribe(data => {

      this.cars = data;

      for (const car of this.cars) {
        this.giphyService.get(car.name).subscribe(url => car.giphyUrl = url);
      }
    });
  }
}
metoda ngOnInit wywoływana jest raz, zaraz po konstruktorze klasy oraz pierwszym wywołaniu zdarzenia ngOnChanges (jeżeli istnieją pola oznaczone dekoratorem @Input()). Metoda subscribe podłącza się do strumienia. Pozwala to na asynchroniczną aktualizację danych o liście samochodów za każdym razem kiedy zostanie dodany do listy nowy samochód bądź zostanie edytowany już istniejący. Dekorator @Injectable nie jest potrzebny w przypadku komponentów – http://blog.ninja-squad.com/2016/12/08/angular-injectable.
Plik car-list.component.html:
<mat-card>
  <mat-card-header>Car List</mat-card-header>
  <mat-card-content>
    <mat-list>
      <!-- The *ngFor directive tells Angular to iterate over a list. -->
      <mat-list-item *ngFor="let car of cars">
        <img mat-list-avatar src="{{car.giphyUrl}}" alt="{{car.name}}">
        <h3 mat-line>
          <a mat-button [routerLink]="['/car-edit', car.id]">{{car.name}}</a>
        </h3>
      </mat-list-item>
    </mat-list>
  </mat-card-content>
  <button mat-fab color="primary" [routerLink]="['/car-add']">add</button>
</mat-card>
Czas na zaimportowanie grafiki – dodajemy do pliku ./src/app/app.module.ts wpis:
import { MatButtonModule, MatCardModule, MatInputModule, MatListModule, MatToolbarModule } from '@angular/material';
import { BrowserAnimationsModule } from '@angular/platform-browser/animations';
oraz uzupełniamy sekcję import:
BrowserModule,
HttpClientModule,
BrowserAnimationsModule,
MatButtonModule,
MatCardModule,
MatInputModule,
MatListModule,
MatToolbarModule
dodajemy wpis do pliku reprezentującego css ./src/style.css:
@import "~@angular/material/prebuilt-themes/pink-bluegrey.css";
@import 'http://fonts.googleapis.com/icon?family=Material+Icons';

body {
 margin: 0;
 font-family: Roboto, sans-serif;
}
Utwórzmy usługę tak jak poprzednio (NIE komponent a usługę) która pobiera graficzne ikony do nazw elementów dodawanych do kolekcji samochodów:
import { Injectable } from '@angular/core';
import { HttpClient } from '@angular/common/http';
import 'rxjs/add/operator/map';

@Injectable()
export class GiphyService {

  // public beta key: http://github.com/Giphy/GiphyAPI#public-beta-key
  giphyApi = '//api.giphy.com/v1/gifs/search?api_key=dc6zaTOxFJmzC&limit=1&q=';

  constructor(public http: HttpClient) {
  }

  get(searchTerm) {
    const apiLink = this.giphyApi + searchTerm;
    return this.http.get(apiLink).map((response: any) => {
      if (response.data.length > 0) {
        return response.data[0].images.original.url;
      } else {
        return 'http://media.giphy.com/media/YaOxRsmrv9IeA/giphy.gif'; // dancing cat for 404
      }
    });
  }
}
uzupełniamy plik ./src/app/app.module.ts:
providers: [CarService, GiphyService],
tworzymy nowy komponent do edycji:
ng g c car-editPlik ./src/app/car-list/car-edit.component.ts:
import { Component, OnDestroy, OnInit         } from '@angular/core';
import { Subscription                         } from 'rxjs/Subscription';
import { ActivatedRoute, Router, ParamMap     } from '@angular/router';
import { CarService                           } from '../shared/car/car.service';
import { GiphyService                         } from '../shared/giphy/giphy.service';
import { NgForm                               } from '@angular/forms';
import {switchMap, map, catchError, skipWhile } from 'rxjs/operators';
import { Observable                           } from 'rxjs/Rx';
import 'rxjs/add/operator/catch';
import 'rxjs/util/pipe';

@Component({
  selector    : 'app-car-edit',
  templateUrl : './car-edit.component.html',
  styleUrls   : ['./car-edit.component.css']
})
export class CarEditComponent implements OnInit,OnDestroy {

  car: any = {};

  sub: Subscription;

  constructor(private route         : ActivatedRoute,
              private router        : Router,
              private carService    : CarService,
              private giphyService  : GiphyService) {
  }

  ngOnInit() {

  this.sub = this.route.paramMap.

        pipe(

          skipWhile(params => !params),

          switchMap((params: ParamMap) => {
                   return this.carService.get(params.get('id'));
               }),

          map((car: any) => {
              this.car      = car;
              this.car.href = car._links.self.href;
              this.giphyService.get(car.name).subscribe(url => car.giphyUrl = url);
          }),

          catchError((error, caught) => {
              return Observable.throw(error);
           })

        ).subscribe();
  }

  ngOnDestroy() {
    this.sub.unsubscribe();
  }

  gotoList() {
    this.router.navigate(['/car-list']);
  }

  save(form: NgForm) {
    this.carService.save(form).subscribe(result => {
      this.gotoList();
    }, error => console.error(error));
  }

  remove(href) {
    this.carService.remove(href).subscribe(result => {
      this.gotoList();
    }, error => console.error(error));
  }
}
Plik ./src/app/car-edit/car-edit.component.html:
<mat-card>
  <form #carForm="ngForm" (ngSubmit)="save(carForm.value)">
    <mat-card-header>
      <mat-card-title><h2>{{car.name ? 'Edit' : 'Add'}} Car</h2></mat-card-title>
    </mat-card-header>
    <mat-card-content>
      <input type="hidden" name="href" [(ngModel)]="car.href">
      <mat-form-field>
        <input matInput placeholder="Car Name" [(ngModel)]="car.name"
               required name="name" #www>
      </mat-form-field>
    </mat-card-content>
    <mat-card-actions>
      <button mat-raised-button color="primary" type="submit"
              [disabled]="!carForm.form.valid">Save</button>
      <button mat-raised-button color="secondary" (click)="remove(car.href)"
              *ngIf="car.href" type="button">Delete</button>
      <a mat-button routerLink="/car-list">Cancel</a>
    </mat-card-actions>
    <mat-card-footer>
      <div class="giphy">
        <img src="{{car.giphyUrl}}" alt="{{car.name}}">
      </div>
    </mat-card-footer>
  </form>
</mat-card>
uzupełniamy plik ./src/app/app.module.ts o routing oraz o moduł FormsModule:
import { FormsModule } from '@angular/forms';
import { RouterModule, Routes } from '@angular/router';

const appRoutes: Routes = [
  { path: '', redirectTo: '/car-list', pathMatch: 'full' },
  {
    path: 'car-list',
    component: CarListComponent
  },
  {
    path: 'car-add',
    component: CarEditComponent
  },
  {
    path: 'car-edit/:id',
    component: CarEditComponent
  }
];

@NgModule({
  ...
  imports: [
    ...
    FormsModule,
    RouterModule.forRoot(appRoutes)
  ],
  ...
})
Dodanie klasy stylu do pliku ./src/app/car-edit/car-edit.component.css:
.giphy {
  margin: 10px;
}
Modyfikacja pliku ./src/app/app.component.html:
<mat-toolbar color="primary">
  <span>Welcome to {{title}}!</span>
</mat-toolbar>

<router-outlet></router-outlet>
Konfiguracja modelu SSO z użyciem systemu http://www.okta.com:
W katalogu projektu należy wydać komendę:
npm install @okta/okta-angular@1.0.0
W pliku ./src/app/app.module.ts dodajemy wpis:
const config = {
  issuer: 'http://dev-125577.oktapreview.com/oauth2/default/',
  redirectUri: 'http://localhost:4200/implicit/callback',
  clientId: '0oaj7e7dkfx4np1yW0h7'
};
importujemy:
import { OktaCallbackComponent, OktaAuthModule } from '@okta/okta-angular';
oraz dodajemy do @NgModule:
@NgModule({
  ...
  imports: [
    ...
    OktaAuthModule.initAuth(config)
  ],
  ...
})
należy również dodać odpowiedni routing:
const appRoutes: Routes = [
  ...
  {
    path: 'implicit/callback',
    component: OktaCallbackComponent
  }
];
Tworzymy interceptor który będzie miał zadanie dodawać token autoryzacyjny do każdego żądania HTTP:
Plik ./src/app/shared/okta/auth.interceptor.ts:
import { Injectable      } from '@angular/core';
import { Observable      } from 'rxjs/Observable';
import { OktaAuthService } from '@okta/okta-angular';
import { fromPromise     } from 'rxjs/observable/fromPromise';

import { HttpEvent, HttpHandler, HttpInterceptor, HttpRequest } from '@angular/common/http';

@Injectable()
export class AuthInterceptor implements HttpInterceptor {

  constructor(private oktaAuth: OktaAuthService) {
  }

  intercept(request: HttpRequest<any>, next: HttpHandler): Observable<HttpEvent<any>> {
    return fromPromise(this.handleAccess(request, next));
  }

  private async handleAccess(request: HttpRequest<any>, next: HttpHandler): Promise<HttpEvent<any>> {
    // Only add to known domains since we don't want to send our tokens to just anyone.
    // Also, Giphy's API fails when the request includes a token.
    if (request.urlWithParams.indexOf('localhost') > -1) {
      const accessToken = await this.oktaAuth.getAccessToken();
      request = request.clone({
        setHeaders: {
          Authorization: 'Bearer ' + accessToken
        }
      });
    }
    return next.handle(request).toPromise();
  }
}
Rejestrujemy interceptor w pliku ./app/app.module.ts:
import { HTTP_INTERCEPTORS } from '@angular/common/http';
import { AuthInterceptor } from './shared/okta/auth.interceptor';

@NgModule({
  ...
  providers: [CarService, GiphyService,
    {provide: HTTP_INTERCEPTORS, useClass: AuthInterceptor, multi: true}],
  ...
})
Modyfikujemy plik app.component.html:
<mat-toolbar color="primary">
  <span>Welcome to {{title}}!</span>
  <span class="toolbar-spacer"></span>
  <button mat-raised-button color="accent" *ngIf="isAuthenticated"
          (click)="oktaAuth.logout()" [routerLink]="['/home']">Logout
  </button>
</mat-toolbar>

<router-outlet></router-outlet>
Dodatkowy css:
Plik ./src/app/app.component.css
.toolbar-spacer {
  flex: 1 1 auto;
}
Modyfikacja pliku ./src/app/app.component.ts – weryfikacja autentykacji użytkownika:
import { Component, OnInit } from '@angular/core';
import { OktaAuthService } from '@okta/okta-angular';

@Component({
  selector: 'app-root',
  templateUrl: './app.component.html',
  styleUrls: ['./app.component.css']
})
export class AppComponent implements OnInit {
  title = 'app';
  isAuthenticated: boolean;

  constructor(private oktaAuth: OktaAuthService) {
  }

  async ngOnInit() {
    this.isAuthenticated = await this.oktaAuth.isAuthenticated();
    // Subscribe to authentication state changes
    this.oktaAuth.$authenticationState.subscribe(
      (isAuthenticated: boolean)  => this.isAuthenticated = isAuthenticated
    );
  }
}
Ostatnim elementem jest dodanie modułu home:
ng g c home
Modyfikacja pliku ./src/app/app.module.ts:
const appRoutes: Routes = [
  {path: '', redirectTo: '/home', pathMatch: 'full'},
  {
    path: 'home',
    component: HomeComponent
  },
  ...
}
Plik ./src/app/home/home.component.html:
<mat-card>
  <mat-card-content>
    <button mat-raised-button color="accent" *ngIf="!isAuthenticated"
            (click)="oktaAuth.loginRedirect()">Login
    </button>
    <button mat-raised-button color="accent" *ngIf="isAuthenticated"
            [routerLink]="['/car-list']">Car List
    </button>
  </mat-card-content>
</mat-card>
Plik ./src/app/home/home.component.ts:
import { OktaAuthService } from '@okta/okta-angular';

export class HomeComponent implements OnInit {
  isAuthenticated: boolean;

  constructor(private oktaAuth: OktaAuthService) {
  }

  async ngOnInit() {
    this.isAuthenticated = await this.oktaAuth.isAuthenticated();
    // Subscribe to authentication state changes
    this.oktaAuth.$authenticationState.subscribe(
      (isAuthenticated: boolean)  => this.isAuthenticated = isAuthenticated
    );
  }
}
Tstujemy aplikację uruchamiając tryb live development (w trybie produkcyjnym nie stosować!):
ng serve
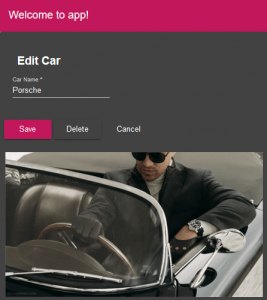
Kilka screenów – widok strony głównej – home:

widok panelu edycji:
Leave a comment